


.jpg?imageView2/1/w/100/h/108/q/60 "N30Pro+ --- Zamia 35W RF CO2 Laser Tube")
.jpg?imageView2/1/w/100/h/108/q/60 "N30Pro --- Zamia 35W RF CO2 Laser Tube")

N-30 --- Zamia 30W RF CO2 Laser Tube


Product Model: N-30/N-30i
Scope of application: Marking/Cutting/Medical/Scientific Research/Military Industry
RF Frequency: 100MHz
Refrigeration mode: Air/water-cooled
Characteristics:
1. Integrative design of compact waveguide cavity structure, RF power supply and all-metal encapsulation of cavity.
2. All-metal structure with sealed off design, maintenance free.
3. High photoelectric conversion efficiency and fast modulation response.
4. Output with excellent beam quality and stable laser power.
5. Suitable for a variety of industrial environments, service life of over 20,000 hours.
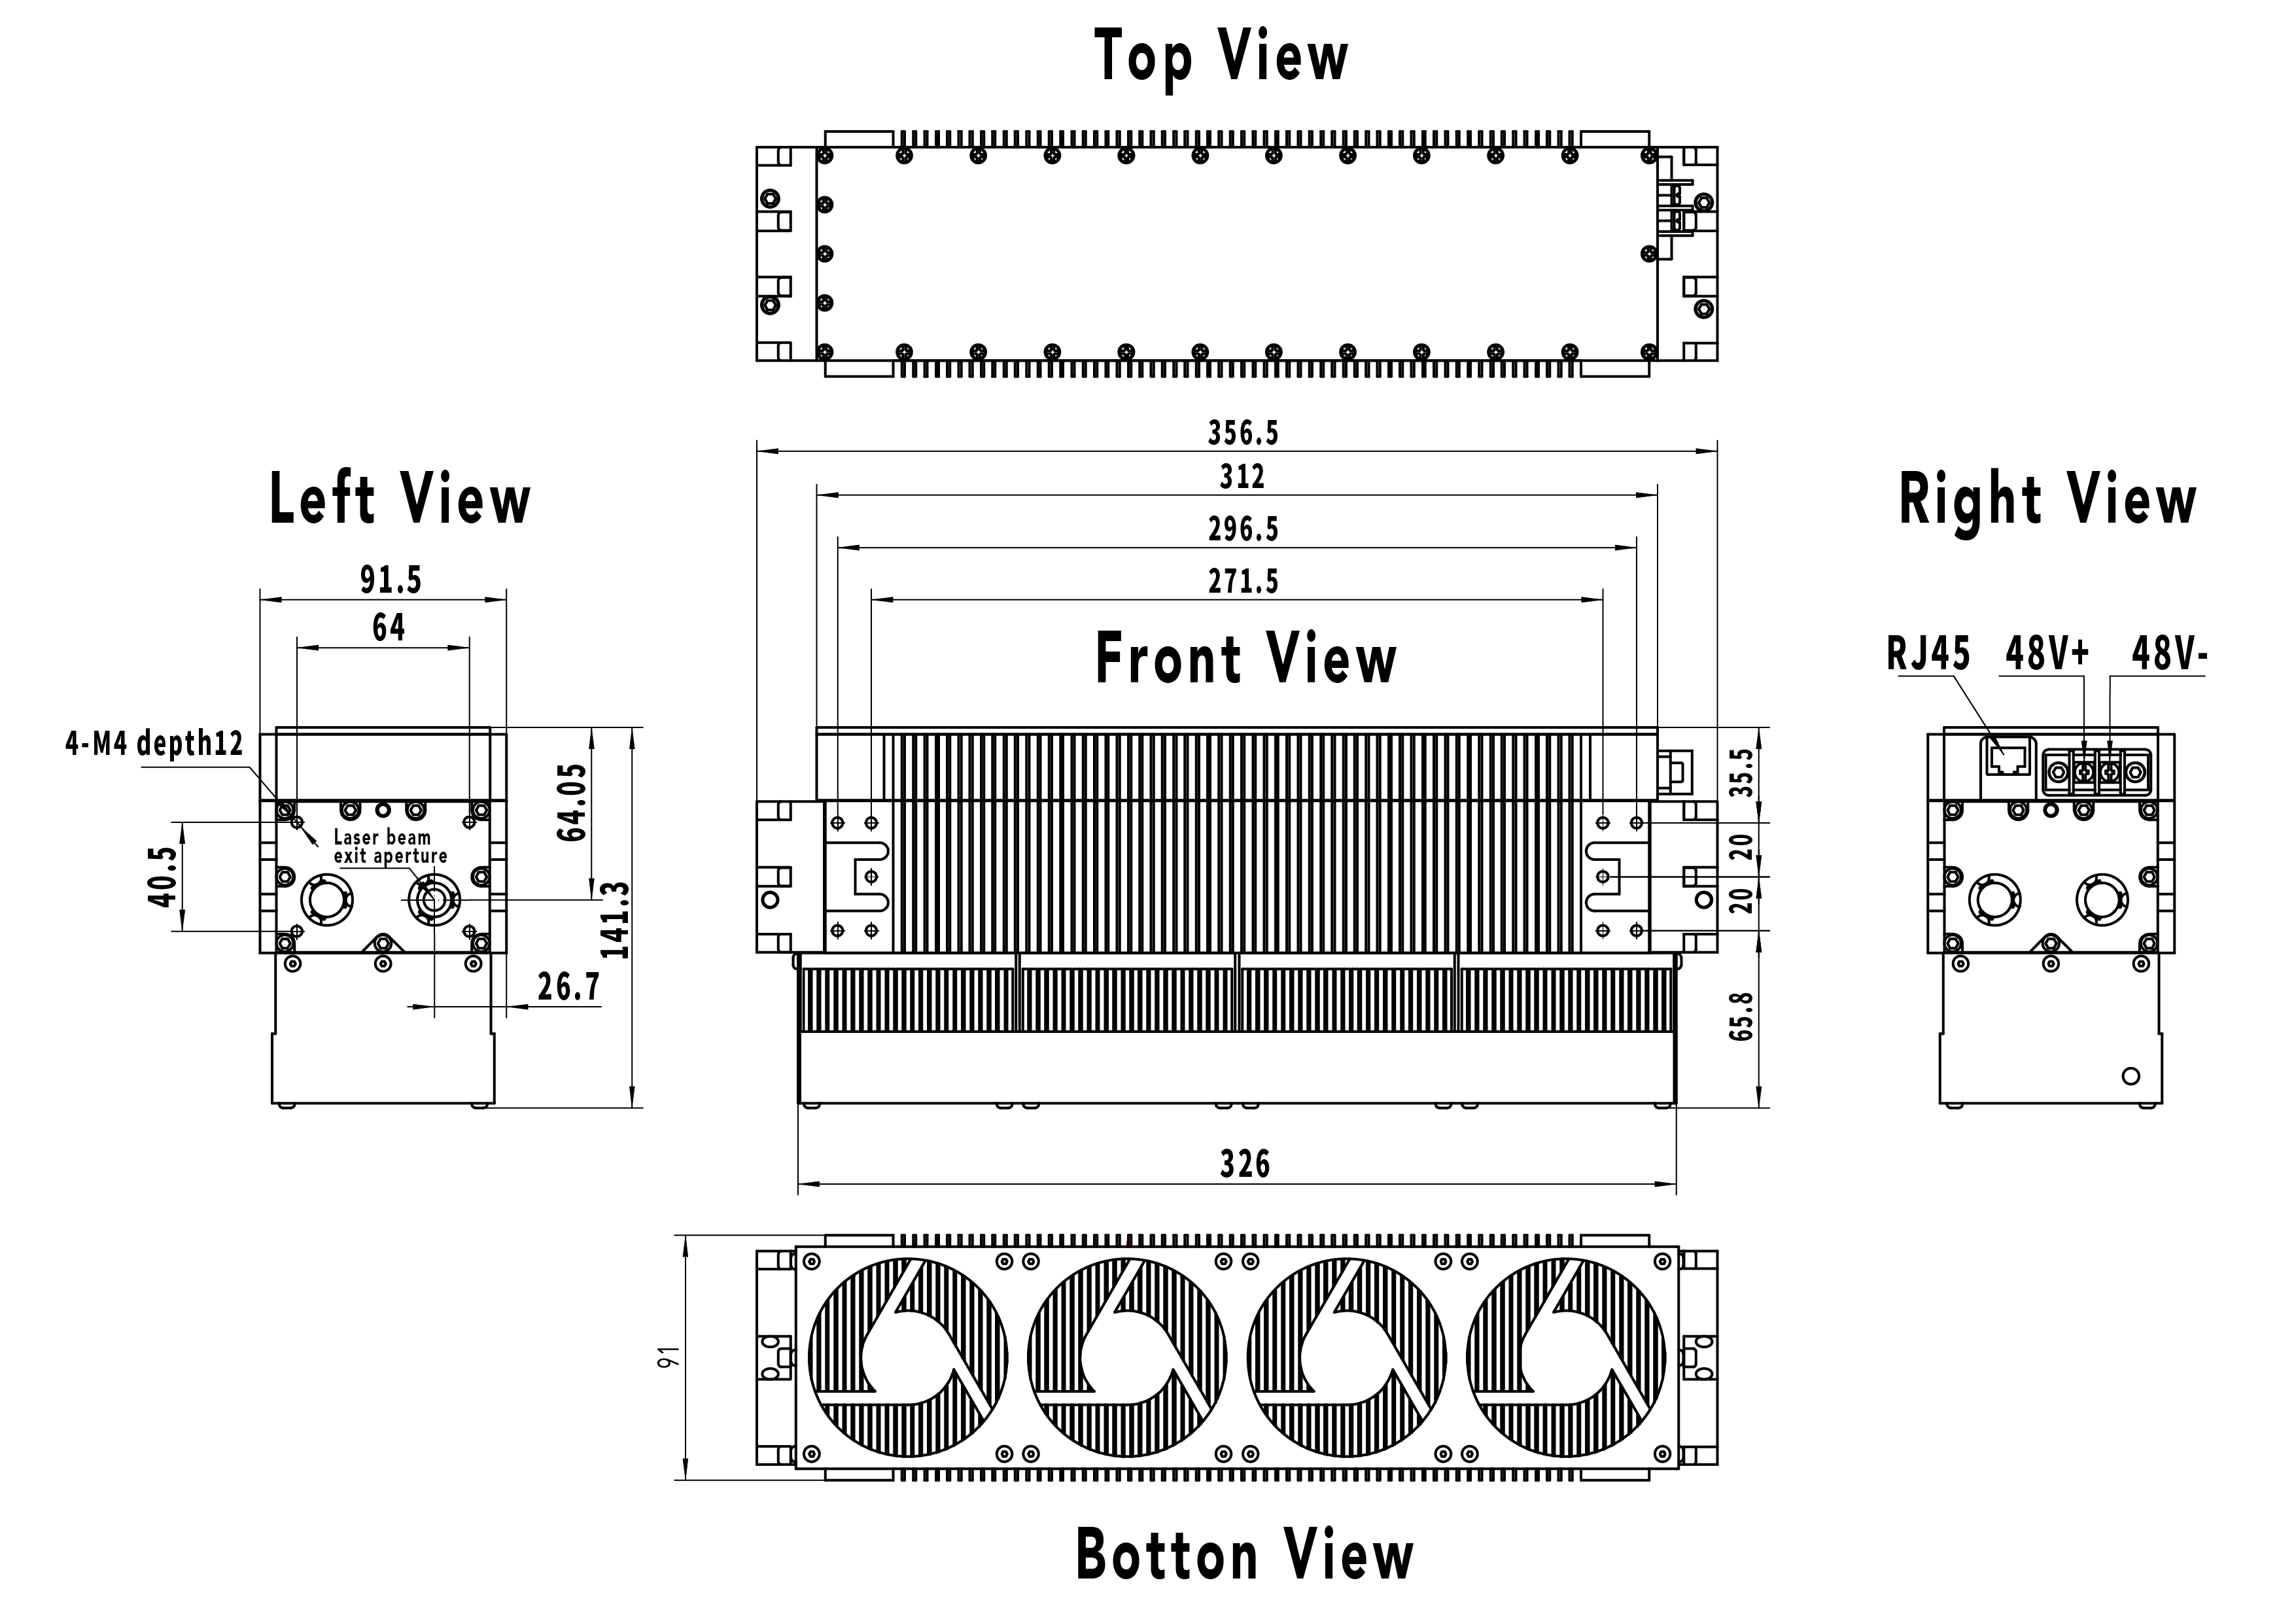
N-30 / N-30i CO2 RF lasers dimensions(Air)
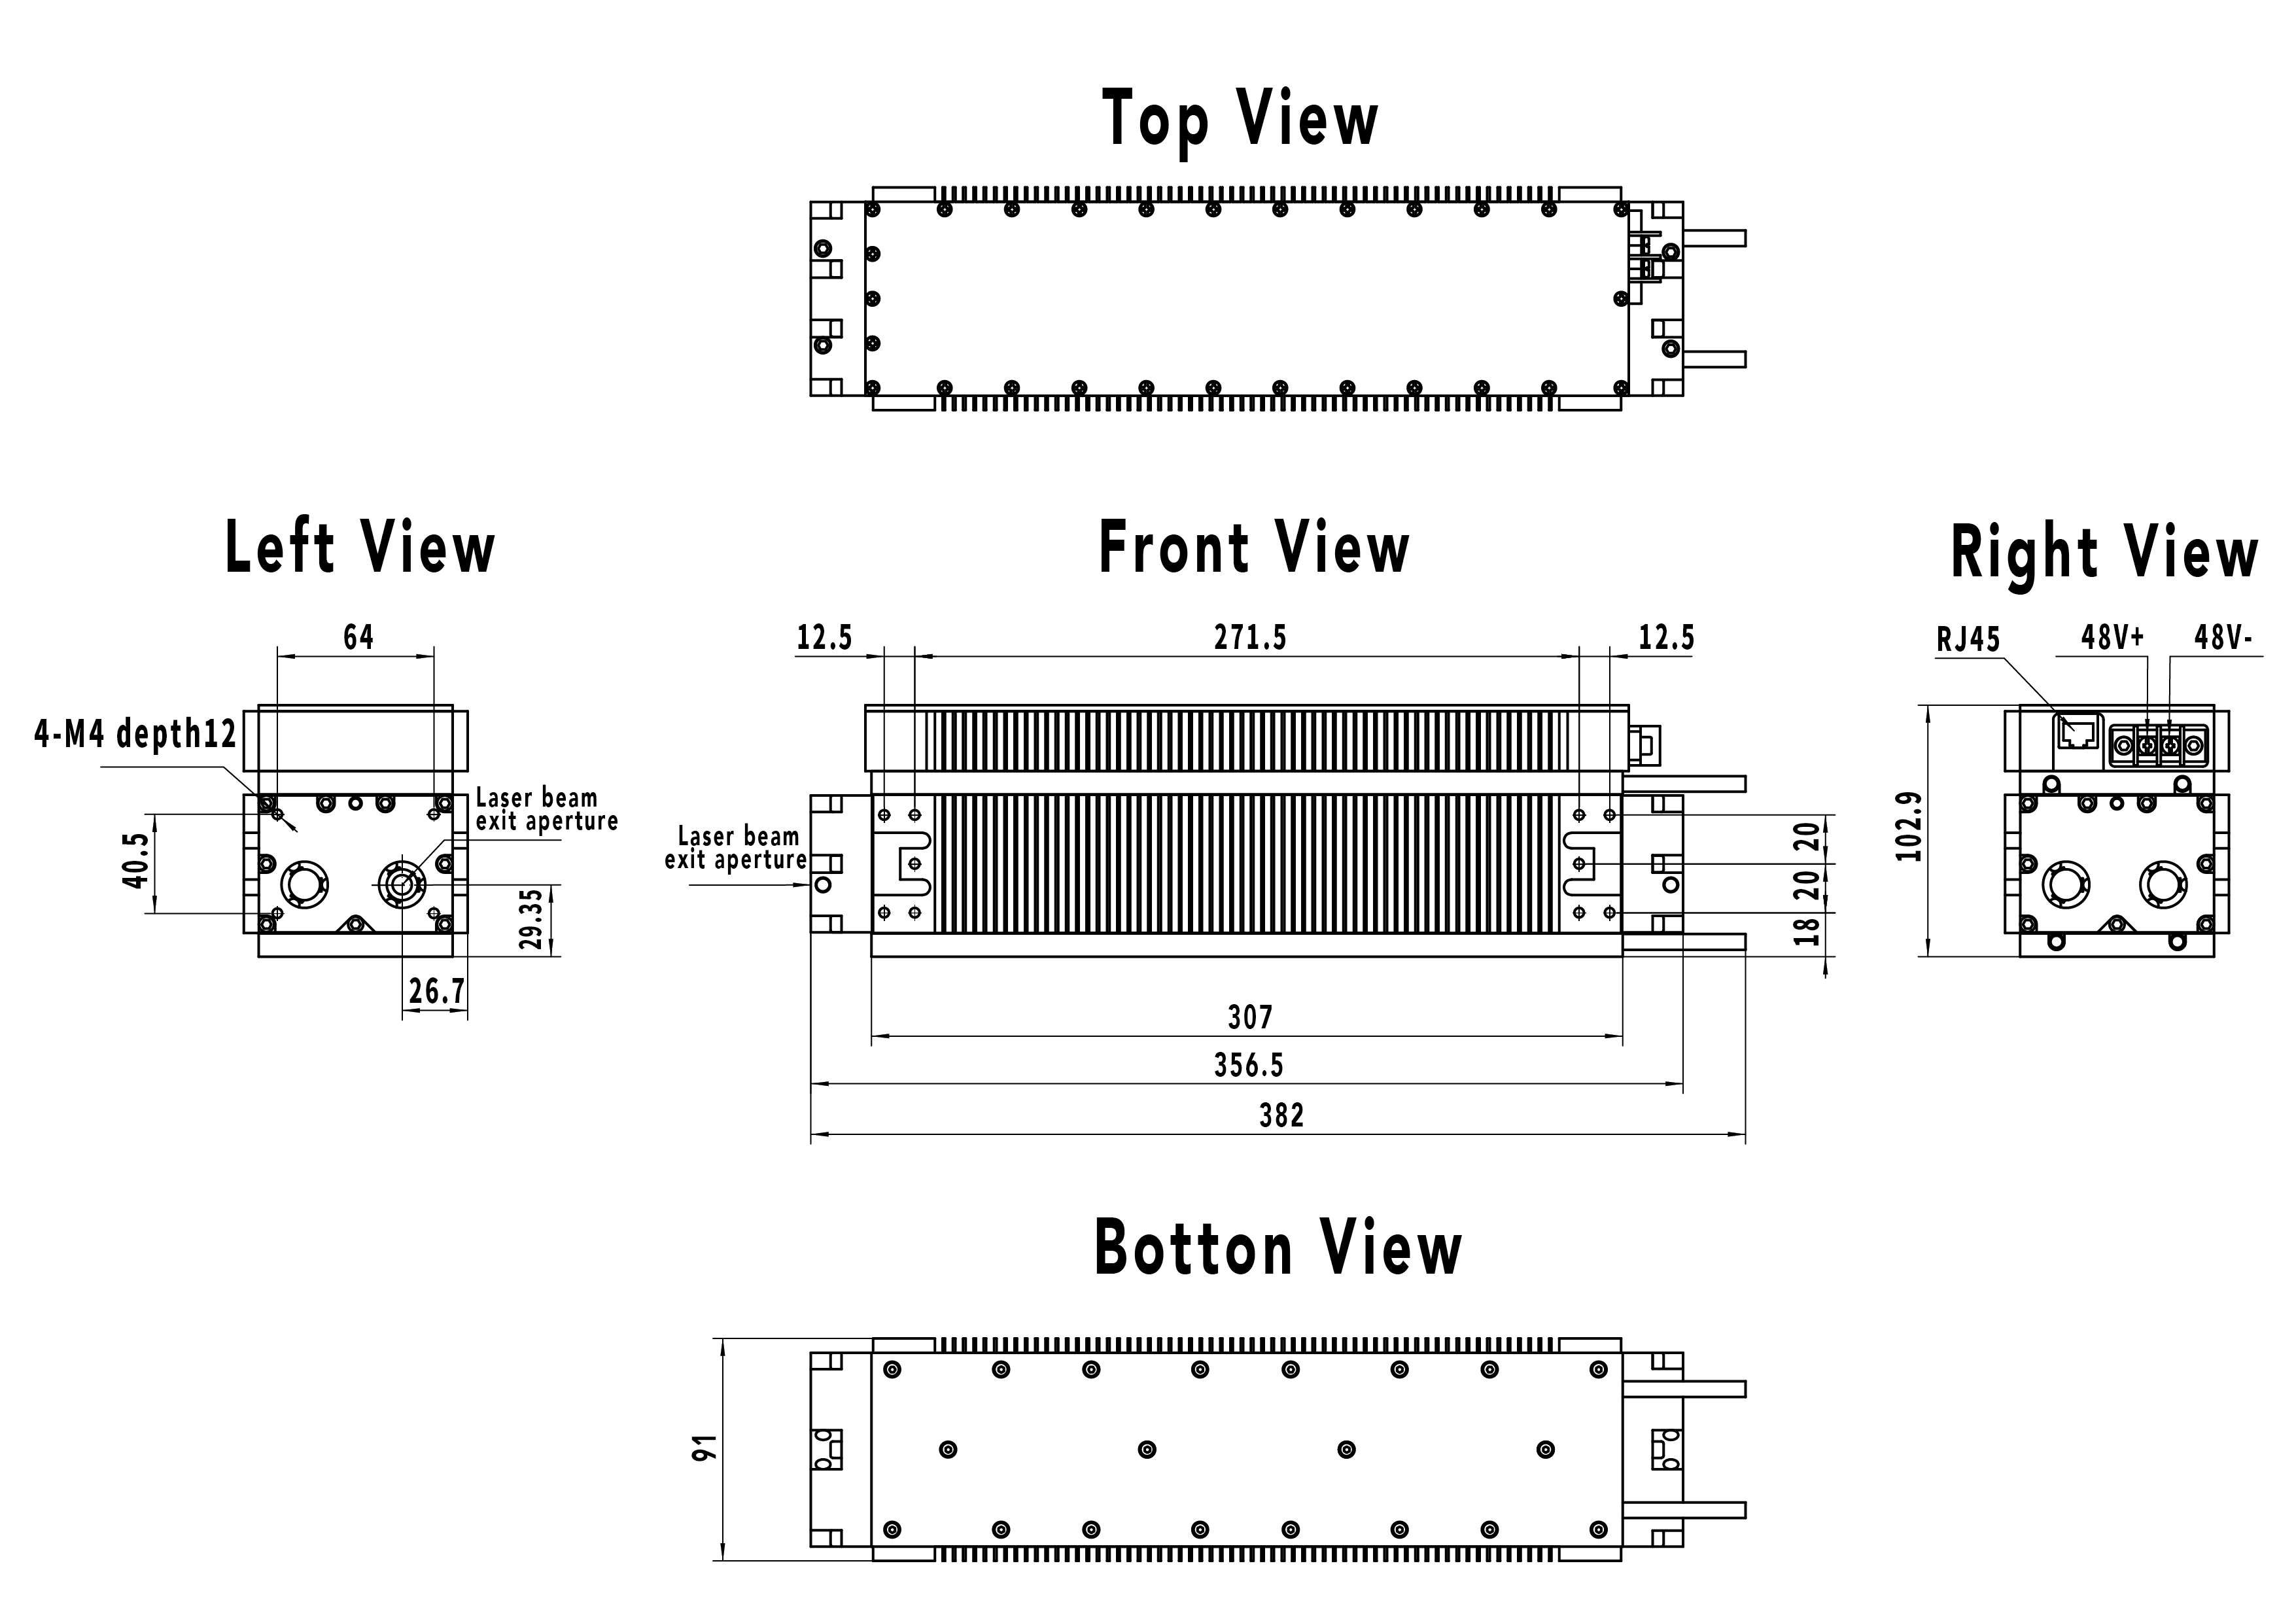
N-30 / N-30i CO2 RF lasers dimensions(Water)
Problems & Solutions
Artificial pre-ionization signal before laser output requirement:
In N-Series lasers, N10 lasers need an external plate to provide pre-ionization signals, with 5KHz, 1μs parameters. The N30 laser has a pre-ionization circuit module, so the user does not need to give the laser additional pre-ionization signals.
Storage and transportation of lasers::
1. In order to prevent the laser output window from contamination, the laser output window must be sealed during storage and transportation.
2. Handle gently to avoid accidental impact to the laser.
Fault diagnosis and elimination of laser indicator:
When the laser works normally, the power supply indicator (green light) turns on after power-on and the laser indicator (pre-ionization signal provided by software) turns on slightly after a 5 seconds’ delay. Once the marking software gives the control signal, the laser indicator (red light) turns on.
1. The green light does not turn on after power supply is turned on.
Check if the DC power supply voltage is within the required range (30 + 2V), and check if the connection of DB15 connector is correct.
2. The green light is normal and the red light is not on after the electricity is turned on.
Check if the labeled software has control signal output (or multimeter measurement), and check if the connection of DB15 connector is correct.
3. The green light is normal after turning power on. After 5 seconds the green light is off or the green light is off after the control signal is given.
This is usually caused by damage to the internal circuit board of the laser or the internal parts of the laser cavity, it needs to be sent back for inspection at the factory.
Laser Environment requirements
1. Temperature: ambient temperature should be between 5 and 40 degrees, and air conditioner should be used when necessary.
2. Cleanliness: without external dust protective equipment, high dust content ambient will cause the laser output window lens to burn out.
3. Humidity: ambient humidity should be maintained low enough to keep condensation to appear in the laser.
4. PH: Environmental PH should be neutral.
Do not wipe the lens of the laser output window with a cotton swab
Wiping with a cotton swab will further damage the lens. If a small amount of particles are attached to the front lens and the film has not been burned, you can try blowing the lens with 99.95% nitrogen.
Choosing the size of the lens in the light path with a know spot size
The size of the lens in the external light path should be 1.5-2 times the size of the actual spot.
Processing terminal power too low despite a normal output power
This is usually caused by a high energy loss in the external light path of the laser. Check the following points:
1. Check if the size of the external light path lens and the aperture are large enough
2. Check if the lens quality of the external light path is qualified (the loss of a single lens can not be higher than 3%)
3. Check if the lenses of the external light path are contaminated or damaged
4. Check if the external light path has been correctly aligned
Check if the external light path has been correctly aligned
When this happens, please first check the following:
1. Use a multimeter to measure whether the DC power supply voltage of the laser is normal
2. Use an oscilloscope to measure whether the control signal to the laser is normal
Scope of application: Marking/Cutting/Medical/Scientific Research/Military Industry
RF Frequency: 100MHz
Refrigeration mode: Air/water-cooled
Characteristics:
1. Integrative design of compact waveguide cavity structure, RF power supply and all-metal encapsulation of cavity.
2. All-metal structure with sealed off design, maintenance free.
3. High photoelectric conversion efficiency and fast modulation response.
4. Output with excellent beam quality and stable laser power.
5. Suitable for a variety of industrial environments, service life of over 20,000 hours.
| Model |
N-30 |
N-30i |
| Pump Method | RF-Excited | |
| RF Frequency |
100MHz |
|
| Laser Resonator | Waveguide | |
| Wavelength | 10.6μm | 9.3μm |
| Average Power |
30W |
17W |
| Output power range |
0~30W |
0~17W |
|
Beam Quality(M²) |
<1.2 | |
| Pulse Rise/ fall time |
<100μs |
|
| PWM Duty Cycle | 0~100% | |
| Modulation |
0~100kHz |
|
| Power stability |
≤±5% |
|
| Beam diameter (1/ e2) |
2.0±0.2mm |
2.0±0.2mm |
| Beam Divergence (full) |
7.5±0.5mrad |
|
| Beam Ellipticity | 0.9-1.1 | |
| Polarization |
Vertical,>100:1 minimum |
|
| Range of Wavelength |
10.55-10.63μm |
9.27-9.33μm |
| Dimensions |
(Air) 357x91.5x140mm (Water) 357x91.5x95mm |
|
|
Weight |
(Air) 6.6kg (Water) 6.0kg |
|
| Input |
48VDC±2VDC/12.5A (Max. current) |
|
| Cooling | Air/Water-cooled | |
| Environmental Temperature |
5~40℃(41-104℉) |
|
| Humidity | ≤95%,NO codensation | |

N-30 / N-30i CO2 RF lasers dimensions(Air)

N-30 / N-30i CO2 RF lasers dimensions(Water)
Problems & Solutions
Artificial pre-ionization signal before laser output requirement:
In N-Series lasers, N10 lasers need an external plate to provide pre-ionization signals, with 5KHz, 1μs parameters. The N30 laser has a pre-ionization circuit module, so the user does not need to give the laser additional pre-ionization signals.
Storage and transportation of lasers::
1. In order to prevent the laser output window from contamination, the laser output window must be sealed during storage and transportation.
2. Handle gently to avoid accidental impact to the laser.
Fault diagnosis and elimination of laser indicator:
When the laser works normally, the power supply indicator (green light) turns on after power-on and the laser indicator (pre-ionization signal provided by software) turns on slightly after a 5 seconds’ delay. Once the marking software gives the control signal, the laser indicator (red light) turns on.
1. The green light does not turn on after power supply is turned on.
Check if the DC power supply voltage is within the required range (30 + 2V), and check if the connection of DB15 connector is correct.
2. The green light is normal and the red light is not on after the electricity is turned on.
Check if the labeled software has control signal output (or multimeter measurement), and check if the connection of DB15 connector is correct.
3. The green light is normal after turning power on. After 5 seconds the green light is off or the green light is off after the control signal is given.
This is usually caused by damage to the internal circuit board of the laser or the internal parts of the laser cavity, it needs to be sent back for inspection at the factory.
Laser Environment requirements
1. Temperature: ambient temperature should be between 5 and 40 degrees, and air conditioner should be used when necessary.
2. Cleanliness: without external dust protective equipment, high dust content ambient will cause the laser output window lens to burn out.
3. Humidity: ambient humidity should be maintained low enough to keep condensation to appear in the laser.
4. PH: Environmental PH should be neutral.
Do not wipe the lens of the laser output window with a cotton swab
Wiping with a cotton swab will further damage the lens. If a small amount of particles are attached to the front lens and the film has not been burned, you can try blowing the lens with 99.95% nitrogen.
Choosing the size of the lens in the light path with a know spot size
The size of the lens in the external light path should be 1.5-2 times the size of the actual spot.
Processing terminal power too low despite a normal output power
This is usually caused by a high energy loss in the external light path of the laser. Check the following points:
1. Check if the size of the external light path lens and the aperture are large enough
2. Check if the lens quality of the external light path is qualified (the loss of a single lens can not be higher than 3%)
3. Check if the lenses of the external light path are contaminated or damaged
4. Check if the external light path has been correctly aligned
Check if the external light path has been correctly aligned
When this happens, please first check the following:
1. Use a multimeter to measure whether the DC power supply voltage of the laser is normal
2. Use an oscilloscope to measure whether the control signal to the laser is normal